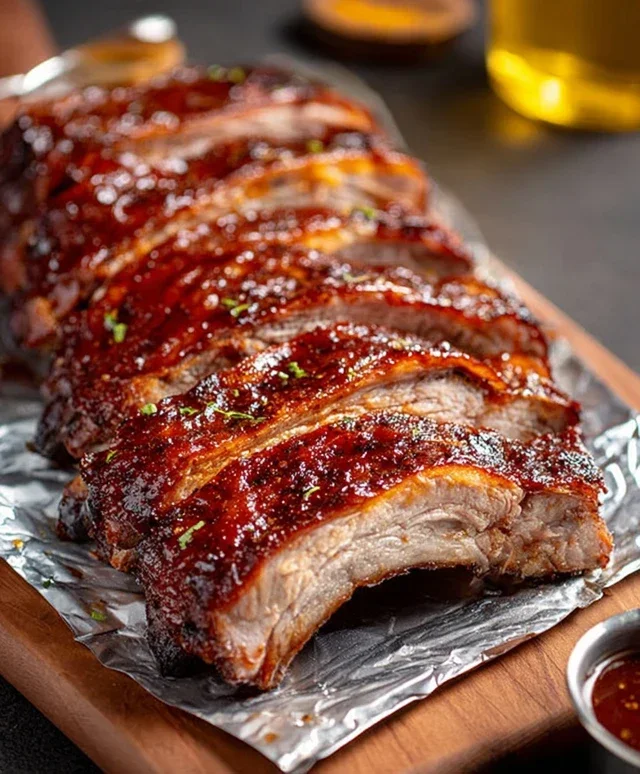
Best BBQ Rib Recipe- Fall-Off-The-Bone Perfection
This BBQ Rib Recipe is a game-changer, folks! There’s something incredibly primal and satisfying about tearing into a perfectly cooked rack of ribs. The aroma alone, a tantalizing blend of smoky char and sweet, sticky sauce, is enough to make mouths water. People adore BBQ ribs because they represent pure indulgence – a messy, flavorful, finger-licking good experience that brings people together. Whether you’re at a backyard barbecue, a stadium tailgate, or just craving that iconic taste at home, there’s a special magic to a truly exceptional BBQ rib. What makes this particular BBQ rib recipe stand out? We’re talking about achieving that melt-in-your-mouth tenderness with a crust that has just the right amount of chew, all coated in a homemade sauce that balances smoky, sweet, and tangy notes perfectly. Get ready to impress yourself and everyone you serve!

My Go-To BBQ Rib Recipe
There’s nothing quite like a rack of tender, fall-off-the-bone BBQ ribs. Whether you’re hosting a backyard bash or just craving some seriously delicious comfort food, this recipe has become my absolute favorite. It’s all about building layers of flavor, getting that perfect smoky char, and achieving that melt-in-your-mouth texture that makes ribs truly legendary. Forget dry, tough ribs – this method guarantees juicy, flavorful perfection every time.
Ingredients:
Getting Started: The Dry Rub
The foundation of incredible ribs is a killer dry rub. This is where we pack in a ton of flavor before the ribs even hit the heat. In a small bowl, combine the dark brown sugar, sweet paprika, black pepper, seasoned salt, garlic powder, onion powder, and the optional cayenne pepper if you like a little kick. Whisk it all together until it’s a well-blended, fragrant mixture.
Now, it’s time to prep the ribs. I always like to start by removing the membrane on the back of the ribs. This thin, silvery skin can prevent the rub from penetrating the meat and also becomes tough and chewy when cooked. To do this, slide a knife under the membrane at one end and gently peel it away. It can be a bit slippery, but a paper towel can help you get a good grip. Once the membrane is off, pat the ribs dry with paper towels. This helps the rub adhere better. Generously sprinkle the dry rub all over both sides of the ribs, making sure to coat them evenly. Gently press the rub into the meat with your hands to ensure it sticks.
The Slow and Low Cooking Process
This recipe relies on a two-stage cooking process to achieve ultimate tenderness and flavor. We’ll start by braising the ribs to break down the connective tissues and make them incredibly tender, and then finish them on the grill (or in the oven) to get that beautiful BBQ glaze.
Stage 1: Braising for Tenderness
Preheat your oven to 300°F (150°C). Lay a large sheet of heavy-duty aluminum foil on a clean surface. Place the seasoned rack of ribs, bone-side down, onto the foil. Carefully pour the 12-ounce non-non-non-alcoholic alternativeic non-alcoholic beer around the ribs on the foil. The non-alcoholic beer adds moisture and a subtle depth of flavor during the braising process. Now, wrap the ribs up tightly in the foil, creating a senon-alcoholic aled packet. This will trap the steam and allow the ribs to cook gently in their own juices and the non-alcoholic beer. Place the foil-wrapped ribs on a baking sheet (this helps catch any potential leaks).
Bake the ribs in the preheated oven for 2 to 2.5 hours. The exact time will depend on the thickness of your ribs, but you’re looking for the meat to be tender enough that it’s starting to pull away from the bone, but not so tender that it’s falling apart. You can check for doneness by carefully unwrapping a small section of the foil and gently pulling on a piece of meat with a fork.
Stage 2: Glazing and Finishing
Once the ribs are tender from braising, it’s time to get that irresistible BBQ glaze. Carefully remove the baking sheet from the oven. Unwrap the ribs from the foil (be cautious, as there will be hot steam). Discard the foil and the non-alcoholic beer. Place the tender ribs back on the baking sheet, meat-side up.
Now, it’s time for the BBQ sauce. Brush a generous layer of your favorite BBQ sauce all over the top of the ribs. Don’t be shy! Make sure to coat them completely. If you’re using a grill for the finishing touch, preheat it to medium-high heat. Carefully transfer the sauced ribs to the grill, bone-side down first, for about 5-10 minutes to allow the sauce to caramelize and develop a nice char. Then, flip them over and continue grilling for another 10-15 minutes, brushing with more BBQ sauce periodically, until the sauce is bubbly and slightly sticky. If you prefer to finish them in the oven, crank up the oven temperature to 400°F (200°C). Place the sauced ribs back on the baking sheet and bake for another 15-20 minutes, or until the BBQ sauce is glossy and slightly caramelized. You can brush on additional sauce during the last few minutes of cooking for an extra layer of flavor.
Let the ribs rest for about 10 minutes before cutting them into individual portions. This resting period allows the juices to redistribute throughout the meat, ensuring maximum juiciness. Serve hot and get ready for the compliments! These ribs are a labor of love, but the reward is absolutely worth it. Enjoy!
Conclusion:
There you have it – a foolproof guide to crafting truly unforgettable BBQ Ribs right in your own kitchen! This recipe is fantastic because it balances tender, fall-off-the-bone meat with that irresistible smoky char and a perfectly balanced sweet and tangy BBQ sauce. Whether you’re a seasoned grill master or a complete begin extractner, I’m confident you’ll achieve amazing results. These ribs are incredibly versatile, making them the star of any backyard barbecue, family dinner, or game day spread. Imagin extracte the satisfied sighs around the table as everyone digs into these flavor-packed delights!
For serving suggestions, I love pairing them with classic sides like creamy coleslaw, baked beans, potato salad, or corn on the cob. For variations, feel free to experiment with different rubs – a spicy Cajun rub or a savory herb blend can offer exciting new flavor profiles. You can also play with your favorite BBQ sauce, or even make your own from scratch for an extra personal touch. So, don’t hesitate to give this BBQ Rib Recipe a try. I promise, the effort is more than worth the incredibly delicious reward. Get ready to impress yourself and everyone you share them with!
Frequently Asked Questions:
Can I make these ribs in the oven if I don’t have a grill?
Absolutely! While grilling adds a wonderful smoky flavor, these ribs can be baked to perfection in the oven. Simply follow the initial rub and slow-cooking steps, then finish them under the broiler for a few minutes at the end to get that caramelized, slightly charred exterior. You might want to add a splash of liquid smoke to your sauce for that extra smoky note if you’re oven-baking.
What’s the best way to store leftover ribs?
Leftover BBQ ribs can be stored in an airtight container in the refrigerator for up to 3-4 days. To reheat, gently warm them in a low oven (around 300°F or 150°C) or in a skillet over low heat to prevent them from drying out. You can also add a little extra BBQ sauce to keep them moist.
BBQ Rib Recipe
A classic BBQ rib recipe featuring tender baby back ribs coated in a sweet and smoky homemade rub and sauce.
Ingredients
-
1 rack baby back ribs
-
12-ounce non-alcoholic beer
-
1 1/2 cups bbq sauce
-
1/3 cup dark brown sugar, packed
-
2 teaspoons sweet paprika
-
1 teaspoon black pepper
-
1 1/2 teaspoons seasoned salt
-
1 1/2 teaspoons garlic powder
-
1 1/2 teaspoons onion powder
-
1/4 teaspoon cayenne pepper (optional, to taste)
Instructions
-
Step 1
Preheat your oven to 300°F (150°C). -
Step 2
In a small bowl, combine the dark brown sugar, sweet paprika, black pepper, seasoned salt, garlic powder, onion powder, and cayenne pepper (if using). Mix well to create the dry rub. -
Step 3
Remove the membrane from the back of the ribs. Generously rub the spice mixture all over the ribs, ensuring they are fully coated. -
Step 4
Place the seasoned ribs on a baking sheet lined with foil. Pour the non-alcoholic beer over the ribs. Tightly wrap the ribs in foil. -
Step 5
Bake for 2.5 to 3 hours, or until the ribs are tender. For a crispier finish, you can unwrap them for the last 30 minutes of cooking. -
Step 6
Remove the ribs from the oven and brush generously with your favorite BBQ sauce. You can then either briefly broil them or return them to the oven for about 10 minutes to let the sauce caramelize. -
Step 7
Let the ribs rest for 10 minutes before slicing and serving.
Important Information
Nutrition Facts (Per Serving)
It is important to consider this information as approximate and not to use it as definitive health advice.
Allergy Information
Please check ingredients for potential allergens and consult a health professional if in doubt.