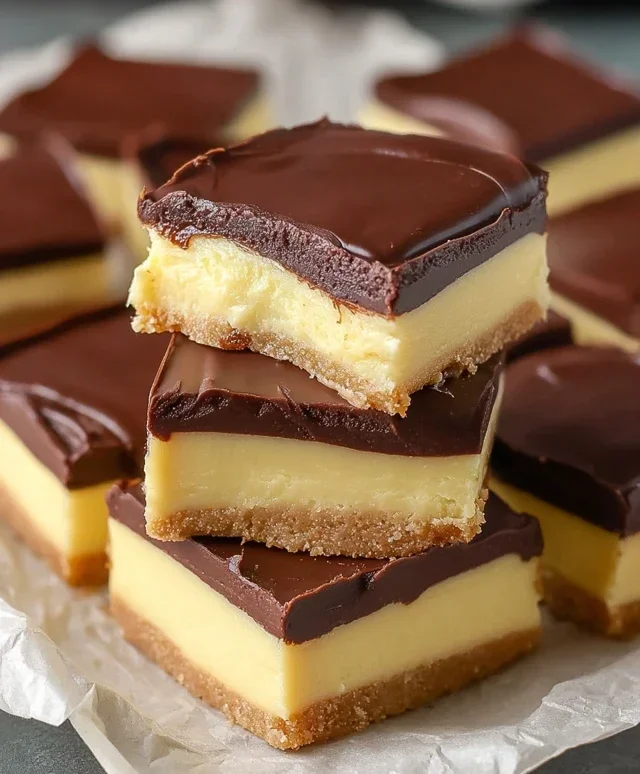
Boston Cream Pie Fudge- Decadent Chocolate Dessert
Boston Cream Pie Fudge is a dessert lover’s dream, a decadent fusion of two iconic treats. Who can resist the allure of a classic Boston Cream Pie, with its luscious pastry cream and rich chocolate ganache? Now imagin extracte all that irresistible flavor, condensed into a chewy, melt-in-your-mouth fudge! I’m always on the lookout for ways to elevate familiar favorites, and this Boston Cream Pie Fudge delivers in spades. It’s the perfect answer for those moments when you crave something sweet and sophisticated, but want to skip the baking. This isn’t just fudge; it’s a little slice of pure happiness, a guaranteed crowd-pleaser that will have everyone asking for the recipe. Get ready to experience your favorite pie in an entirely new, impossibly delicious form.

Boston Cream Pie Fudge
Get ready to experience a truly decadent treat that captures the beloved flavors of Boston Cream Pie in a rich, creamy fudge! This recipe takes all the classic elements – the smooth custard, the decadent chocolate glaze, and the sweet cake-like base – and transforms them into an irresistible fudge. It’s surprisingly easy to make and perfect for sharing (or not!). The layers of vanilla pudding and chocolate come together beautifully, creating a dessert that’s both nostalgic and incredibly delicious. Forget the fuss of baking a traditional pie; this fudge delivers all the joy with half the effort.
Ingredients:
Preparing Your Fudge Base
The first step in creating our Boston Cream Pie Fudge is to build the foundational creamy layer. This is where we’ll incorporate the luscious white chocolate and the creamy sweetness that forms the bulk of our fudge. We want to ensure this mixture is perfectly smooth and integrated before we move on to the chocolate element.
Step 1: Melting the White Chocolate Base
In a medium, heavy-bottomed saucepan, combine the 2 cups of sugar, 4 oz of unsalted butter, and 1/2 cup of heavy cream. Place the saucepan over medium heat. Stir constantly with a whisk or wooden spoon, ensuring the butter is fully melted and the sugar begin extracts to dissolve. Bring this mixture to a rolling boil, meaning it boils vigorously without you needing to stir it for exactly one minute. This precise boiling time is crucial for the sugar to properly dissolve and create the right texture for our fudge. Once the minute is up, immediately remove the saucepan from the heat.
Step 2: Incorporating the Creamy Elements
While the sugar mixture is still hot, add the 2 cups of white chocolate chips and the entire 7 oz container of marshmallow creme. Stir gently but continuously. The heat from the mixture will begin extract to melt the white chocolate chips and soften the marshmallow creme. Keep stirring until both are completely melted and smoothly incorporated into the sugar and cream. It might take a few minutes for everything to come together into a silky smooth, glossy mixture. This is the point where we add the flavor! Stir in the 3 tbsp of vanilla pudding powder and the 1/2 tsp of vanilla extract. The vanilla pudding powder is key to achieving that distinct custard-like flavor and contributing to a slightly firmer fudge texture, mimicking the cream filling of the pie. Continue to stir until the pudding powder is fully dissolved and there are no lumps.
Crafting the Chocolate Swirl
Now it’s time to introduce the rich chocolate element that defines the “pie” aspect of our fudge. This layer will be poured over the vanilla base and gently swirled to create a beautiful marbled effect, reminiscent of a chocolate glaze.
Step 3: Preparing the Chocolate Topping
In a separate heatproof bowl, combine the 6 oz of semisweet chocolate chips and the 1 tbsp of vegetable oil. You can melt these in the microwave in 30-second intervals, stirring well between each interval, until the chocolate is smooth and glossy. Alternatively, you can use a double boiler method. Place the bowl over a saucepan filled with about an inch of simmering water, ensuring the bottom of the bowl does not touch the water. Stir the chocolate and oil until completely melted and smooth. The vegetable oil helps to create a smoother, more fluid chocolate topping that’s easier to pour and swirl.
Assembling and Finishing Your Fudge
With our base and topping ready, we can now bring them together to create our stunning Boston Cream Pie Fudge. Patience is key in this stage to ensure the layers set properly.
Step 4: Layering and Swirling
Line an 8×8 inch baking pan with parchment paper, leaving an overhang on the sides to make it easy to lift the fudge out later. This is a crucial step for easy removal. Pour the warm white chocolate and vanilla pudding mixture into the prepared pan. Spread it evenly with a spatula. Immediately pour the melted semisweet chocolate mixture over the top of the vanilla layer. Using a toothpick or the tip of a knife, gently swirl the chocolate into the vanilla base. Don’t overmix; you want distinct swirls of chocolate throughout the creamy white layer, not a uniform brown color. Aim for elegant streaks that capture the essence of a chocolate ganache.
Step 5: Chilling and Cutting
Once you’ve achieved your desired swirl pattern, place the pan in the refrigerator. Allow the fudge to chill for at least 2-3 hours, or until it is completely firm to the touch. The chilling process is vital for the fudge to set properly and become sliceable. Once the fudge is firm, use the parchment paper overhang to lift the entire slab out of the pan onto a cutting board. For clean cuts, use a sharp knife that has been warmed slightly under hot water and then dried thoroughly. Cut the fudge into small, bite-sized squares. Store your delicious Boston Cream Pie Fudge in an airtight container at room temperature or in the refrigerator for up to two weeks. Enjoy this delightful twist on a classic!
Conclusion:
And there you have it – your very own Boston Cream Pie Fudge! This recipe is a true celebration of classic flavors in a decadent, easy-to-make format. We’ve transformed the beloved combination of rich chocolate, creamy pastry cream, and sweet ganache into a delightful fudge that’s perfect for sharing (or savoring all to yourself!). It’s incredibly satisfying to create this treat from scratch and the rich, layered taste is simply irresistible. Whether you’re a seasoned baker or new to the kitchen, I encourage you to give this Boston Cream Pie Fudge a try. Its impressive appearance and delicious taste are sure to impress!
For serving, consider cutting it into neat squares for an elegant dessert platter, or enjoy it as a sweet pick-me-up with your afternoon coffee. To add your personal touch, consider variations like a swirl of raspberry jam for a fruity twist, or a sprinkle of sea salt on top to enhance the chocolate notes. Get creative and make it your own!
Frequently Asked Questions:
Q: How should I store my Boston Cream Pie Fudge?
A: Store your fudge in an airtight container at room temperature for up to a week. If your kitchen is particularly warm, you might prefer to store it in the refrigerator, but allow it to come to room temperature before serving for the best texture.
Q: Can I make this fudge ahead of time?
A: Absolutely! This Boston Cream Pie Fudge actually benefits from being made a day in advance, as the flavors have more time to meld together beautifully.
Boston Cream Pie Fudge
A decadent fudge inspired by the classic Boston Cream Pie, featuring layers of creamy white chocolate and rich chocolate.
Ingredients
-
2 cups sugar
-
4 oz unsalted butter
-
1/2 cup heavy cream
-
2 cups white chocolate chips
-
7 oz container of marshmallow creme
-
3 tbsp vanilla pudding
-
1/2 tsp vanilla extract
-
3 tbsp unsweetened cocoa powder
-
6 oz semisweet chocolate chips
-
1 tbsp vegetable oil
Instructions
-
Step 1
In a heavy-bottomed saucepan, combine sugar, butter, and heavy cream. Cook over medium heat, stirring constantly, until butter is melted and sugar is dissolved. -
Step 2
Bring the mixture to a boil, stirring occasionally. Continue to boil for 5 minutes. -
Step 3
Remove from heat. Stir in white chocolate chips, marshmallow creme, vanilla pudding, and vanilla extract until smooth and well combined. This is your white chocolate layer. -
Step 4
Pour half of the white chocolate mixture into a greased 8×8 inch baking pan. Spread evenly. -
Step 5
In a separate small saucepan, melt the semisweet chocolate chips with the vegetable oil over low heat, stirring until smooth. This is your chocolate layer. -
Step 6
Pour the melted semisweet chocolate evenly over the white chocolate layer in the pan. Swirl gently with a knife for a marbled effect, or leave as a distinct layer. -
Step 7
Pour the remaining white chocolate mixture over the chocolate layer. Spread evenly. Allow to cool and set completely at room temperature or in the refrigerator for at least 2-3 hours. -
Step 8
Once set, cut into desired squares.
Important Information
Nutrition Facts (Per Serving)
It is important to consider this information as approximate and not to use it as definitive health advice.
Allergy Information
Please check ingredients for potential allergens and consult a health professional if in doubt.