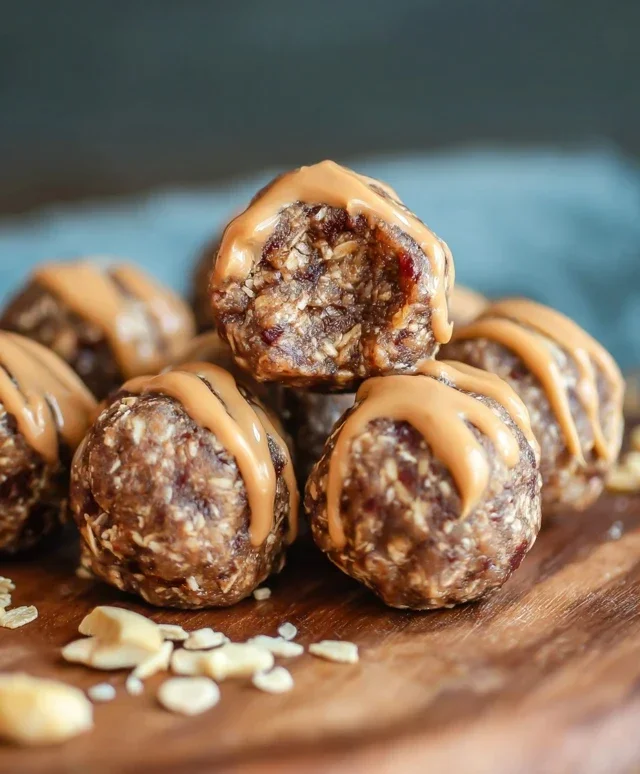
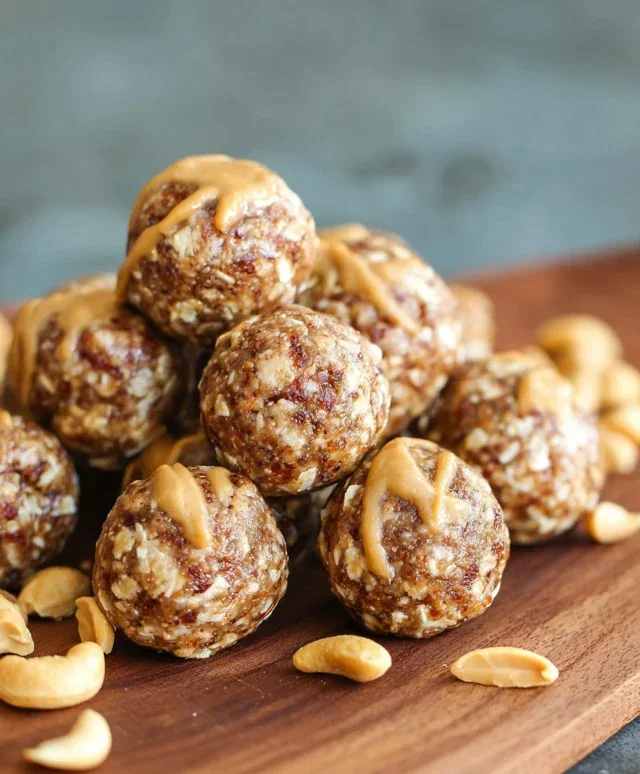
Easy No-Bake Peanut Butter Energy Bites Recipe

No-Bake Peanut Butter Energy Bites are the answer to your cravings for something delicious, satisfying, and ridiculously easy to make. We all have those moments – that mid-afternoon slump hitting hard, a sudden hankering for a sweet treat, or the need for a quick pre-workout boost. That’s where these little powerhouses shine. What makes these no-bake peanut butter energy bites so universally loved? It’s their irresistible combination of creamy peanut butter, wholesome oats, and a hint of sweetness, all coming together without a single minute in the oven. They’re incredibly versatile; you can customize them with your favorite add-ins like chocolate chips or shredded coconut. Plus, the fact that they require zero baking means you can whip up a batch in minutes and enjoy them almost immediately. Get ready to discover your new go-to snack!”

No-Bake Peanut Butter Energy Bites

No-Bake Peanut Butter Energy Bites

Feeling that midday slump? Craving a sweet treat that actually fuels you instead of sending you into a sugar crash? Look no further than these incredibly simple, utterly delicious No-Bake Peanut Butter Energy Bites! These little powerhouses are my go-to snack when I need a quick pick-me-up, a pre-workout boost, or just something to satisfy my sweet tooth without the guilt. What’s even better is that they require absolutely zero oven time, making them perfect for those hot summer days or when you’re just not in the mood for baking. With just a handful of ingredients you probably already have in your pantry, you can whip up a batch in under 10 minutes. They are incredibly versatile, too. Feel free to experiment with add-ins like shredded coconut, chia seeds, or even a sprinkle of cinnamon. But for a classic, crowd-pleasing bite, this recipe is perfection. Let’s get started on creating your new favorite snack!

Ingredients:

  • ½ cup quick oats
  • ¼ cup peanut butter
  • 2 tablespoons honey
  • ¼ cup mini chocolate chips
  • Let’s Get Rolling!

    The beauty of these energy bites lies in their simplicity. There’s no complicated measuring, no fussy techniques – just pure, unadulterated deliciousness coming together in a bowl.

  • Combine the Wet Ingredients: In a medium-sized mixing bowl, add your ¼ cup of creamy (or crunchy, if you prefer!) peanut butter. To this, drizzle in your 2 tablespoons of honey. Now, this is where you get to decide on the sweetness level. If you have a particularly sweet tooth, you might find yourself tempted to add a tiny bit more honey, but I find this amount to be just right, offering a subtle sweetness that complements the nuttiness of the peanut butter beautifully. I like to use natural peanut butter, the kind where the oil separates, as it tends to have a richer, less processed flavor. However, any smooth or crunchy peanut butter will work wonderfully here. Take a spoon or a spatula and vigorously stir these two ingredients together until they are thoroughly combined and have a smooth, glossy appearance. You want a homogenous mixture, ensuring the honey is evenly distributed throughout the peanut butter. This is the sticky base that will hold everything else together, so don’t rush this step.
  • Incorporate the Oats: Once your peanut butter and honey are a happy couple, it’s time to add the ½ cup of quick oats. Quick oats are essential here because they absorb moisture more readily and will create a softer, more cohesive texture for your energy bites. Rolled oats will work, but they might result in a slightly chewier bite, which isn’t necessarily a bad thing, but quick oats offer a smoother experience. Add the oats directly into the bowl with your peanut butter and honey mixture. Now, switch from your stirring tool to your hands (yes, the best tools are often your own!). Gently begin extract to mix the oats into the wet ingredients. It’s going to feel a bit clumpy and dry at first, and you might wonder if you have enough liquid. Don’t worry, keep working it! The natural oils from the peanut butter and the stickiness of the honey will start to coat the oats, and as you continue to mix and knead, the mixture will begin extract to come together. This is where the magic happens – the transformation from separate ingredients to a cohesive dough.
  • Add the Chocolatey Goodness: Now for the irresistible part: the ¼ cup of mini chocolate chips! These little gems add that perfect burst of chocolatey flavor and a delightful texture contrast to the chewy oats and creamy peanut butter. I specifically recommend mini chocolate chips because they distribute more evenly throughout the bites and you get a pleasant chocolatey hit in every mouthful without overwhelming the other flavors. You can absolutely use regular-sized chocolate chips if that’s all you have, but be mindful that they might be a bit chunkier. Add the mini chocolate chips to your bowl. Again, it’s time to get your hands back in there! Gently fold and press the chocolate chips into the oat mixture. You want to ensure they are evenly dispersed, but try not to overmix at this stage. The goal is to have pockets of chocolate throughout, not to completely pulverize them into the dough. This gentle incorporation will give you the best visual appeal and flavor distribution.
  • Forming the Bites: Once all the ingredients are well combined and you have a sticky, dough-like consistency, it’s time to roll! Grab a small cookie scoop or simply use your hands to scoop out about 1 tablespoon of the mixture. Roll the mixture firmly between your palms to form small, compact balls. The key here is to roll them tightly. If the mixture is too sticky and difficult to handle, you can pop the bowl into the refrigerator for about 10-15 minutes to let it firm up slightly. This makes rolling much easier. I like to make my bites about the size of a large marble or a small truffle. If you’re finding them too dry and they’re crum extractbling, it’s a sign that you might need a tiny bit more peanut butter or honey – just a teaspoon at a time, mixed in thoroughly. Conversely, if they are too sticky, add a tablespoon more of oats and mix well. Consistency is key for easy rolling, so don’t be afraid to make minor adjustments.
  • Chill and Enjoy: After you’ve rolled all your delicious energy bites, arrange them on a plate or a baking sheet lined with parchment paper. This prevents them from sticking. Now, for the final, crucial step before indulgin extractg: chilling! Place the plate or baking sheet into the refrigerator for at least 30 minutes. This chilling period is vital. It allows the bites to firm up and hold their shape, making them perfectly dense and chewy. It also helps the flavors meld together beautifully. Once they’re firm, you can transfer them to an airtight container and store them in the refrigerator for up to a week. These are best enjoyed chilled, and they make for an excellent grab-and-go snack. They’re perfect for tucking into lunchboxes, taking on hikes, or simply enjoying with a cup of tea when that afternoon craving strikes. Enjoy these little bursts of energy and happiness!
  • No-Bake Peanut Butter Energy Bites

    Conclusion:

    These no-bake peanut butter energy bites are a game-changer for anyone looking for a quick, healthy, and delicious snack. Packed with wholesome ingredients like oats, peanut butter, and a touch of sweetness, they provide sustained energy without the fuss of baking. They’re perfect for a pre-workout boost, an afternoon pick-me-up, or even a guilt-free dessert. I love how versatile they are; you can easily customize them to your liking. Don’t be afraid to experiment with different mix-ins to find your favorite combination!

    Enjoy these energy bites on their own, or try crum extractbling them over yogurt or a smoothie bowl for an extra textural element. They store beautifully in the refrigerator, making them ideal for meal prepping. I encourage you to give these no-bake peanut butter energy bites a try – I’m confident you’ll find them as satisfying and simple to make as I do!

    Frequently Asked Questions:

    Can I make these without peanut butter?

    Absolutely! If you have a peanut allergy or simply prefer a different flavor, you can substitute the peanut butter with almond butter, cashew butter, sunflower seed butter, or tahini. Just be aware that different nut butters have varying consistencies, so you might need to adjust the amount of liquid sweetener or oats slightly to achieve the perfect texture.

    How long do these energy bites last?

    Stored in an airtight container in the refrigerator, these no-bake peanut butter energy bites will stay fresh for up to two weeks. They are a fantastic make-ahead snack that will be ready whenever a craving strikes.


    No-Bake Peanut Butter Energy Bites

    No-Bake Peanut Butter Energy Bites

    Quick and easy no-bake energy bites perfect for a healthy snack or pre-workout fuel.

    Prep Time
    10 Minutes

    Cook Time
    0 Minutes

    Total Time
    40 Minutes

    Servings
    12-15 bites

    Ingredients

    • ½ cup quick oats
    • ¼ cup peanut butter
    • 2 tablespoons honey
    • ¼ cup mini chocolate chips
    • 1 tablespoon chia seeds
    • 1 teaspoon vanilla extract

    Instructions

    1. Step 1
      In a medium bowl, combine the quick oats, peanut butter, and honey.
    2. Step 2
      Stir until well combined and a dough-like consistency forms.
    3. Step 3
      Fold in the mini chocolate chips, chia seeds, and vanilla extract.
    4. Step 4
      Roll the mixture into bite-sized balls.
    5. Step 5
      Place the energy bites on a parchment-lined plate or baking sheet.
    6. Step 6
      Chill in the refrigerator for at least 30 minutes to allow them to firm up.

    Important Information

    Nutrition Facts (Per Serving)

    It is important to consider this information as approximate and not to use it as definitive health advice.

    Allergy Information

    Please check ingredients for potential allergens and consult a health professional if in doubt.

    Similar Posts

    Leave a Reply

    Your email address will not be published. Required fields are marked *