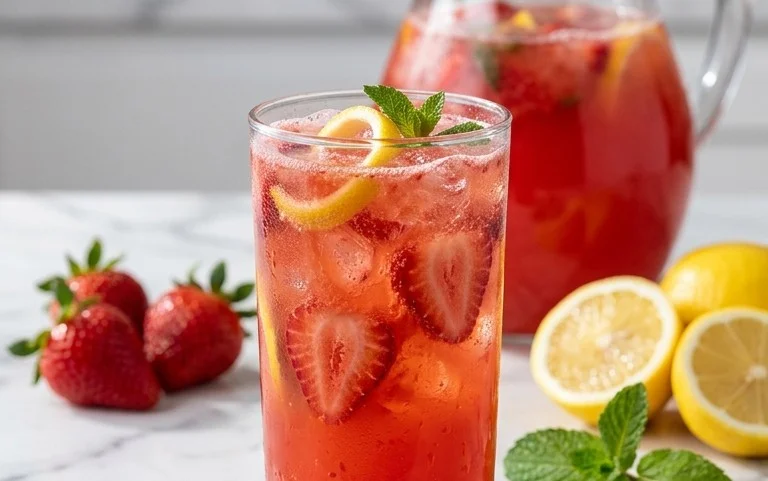
Pineapple Strawberry Slushies – Refreshing Fruity Drink
Pineapple Strawberry Swirled Slushies are more than just a frozen treat; they’re a vibrant explosion of summer sunshine in a glass. Imagin extracte the perfect balance of sweet, tangy pineapple meeting the juicy, ripe burst of strawberries, all blended into a delightfully icy concoction. It’s no wonder these delightful drinks are a perennial favorite for cooling down on a hot day, celebrating special occasions, or simpgin extractindulging in a moment of pure, unadulterated bliss. What truly sets our Pineapple Strawberry Swirled Slushies apart is the mesmerizing swirl effect, creating not only a visual spectacle but also a complex flavor journey with every sip. You get the initial tropical zing of pineapple, followed by the familiar comfort of sweet strawberries, making each taste an adventure.
Why We Adore These Pineapple Strawberry Swirled Slushies
These aren’t your average blended beverages. The magic happens in the careful layering and swirling technique that ensures you experience distinct yet harmonious flavors. They’re incredibly refreshing, offering a welcome respite from the heat without being overly heavy. Plus, the natural sweetness from the fruits means you can feel good about enjoying them as a guilt-free indulgence. Whether you’re hosting a backyard barbecue, planning a pool party, or just craving a delicious pick-me-up, these Pineapple Strawberry Swirled Slushies are guaranteed to impress.

Ingredients:
- 2 cups frozen pineapple chunks
- 1 cup pineapple juice or water
- 1 tablespoon honey (optional, for sweetness)
- 2 cups frozen strawberries
- 1 cup strawberry juice or water
- 1 tablespoon honey (optional, for sweetness)
Creating the Pineapple Layer
Step 1: Prepare the Pineapple Base
The foundation of our vibrant Pineapple Strawberry Swirled Slushies begin extracts with the pineapple. Gather your 2 cups of frozen pineapple chunks and place them into a high-powered blender. The frozen nature of the fruit is key to achieving that perfect slushy consistency, ensuring it’s icy and refreshing without being watered down. If your blender isn’t particularly robust, you might consider letting the pineapple chunks thaw for just a few minutes at room temperature before blending to prevent overworking the motor. Next, add 1 cup of pineapple juice or water to the blender. The juice will impart a more intense pineapple flavor, while water will create a lighter, more neutral base. For those who prefer a touch more sweetness, now is the time to add 1 tablespoon of honey. This is entirely optional, as the pineapple itself often has a natural sweetness, but it can help round out the flavors beautifully.
Step 2: Blend the Pineapple Mixture Until Smooth
Secure the lid on your blendegin extractnd begin to blend the pineapple, liquid, and optional honey. Start on a low speed to break down the frozen chunks, gradually increasing the speed agin extracthe mixture begins to move. You’re aiming for a smooth, thick, and icy consistency, akin to soft-serve ice cream. You may need to stop the blender occasionally and scrape down the sides with a spatula to ensure all the pineapple is incorporated and to prevent any pockets of unblended fruit. The goal is a uniform texture with no large ice shards remaining. This vibrant yellow mixture will form the first delicious layer of our swirled slushy. Once you’ve achieved this smooth texture, set the blender aside without washing it, as we’ll be using it again shortly for the strawberry layer.
Crafting the Strawberry Swirl
Step 3: Blend the Strawberry Mixture
Now, let’s move on to the striking red counterpart. Into the same blender (no need to wash it out – the slight residual pineapple flavor will only enhance the complexity!), add your 2 cups of frozen strawberries. These will provide the beautiful color and a delightful berry tang. Pour in 1 cup of strawberry juice or water. Similar to the pineapple layer, strawberry juice will intensify the fruit flavor, while water offers a lighter option. If you desire a sweeter strawberry layer, add the remaining 1 tablespoon of honey now. This is where you can really play with the sweetness balance to complement the pineapple layer.
Step 4: Blend the Strawberry Mixture Until Smooth
Just like with the pineapplgin extractsecure the lid and begin blending the frozen strawberries, liquid, and optional honey. Start on a lower setting and then increase the speed until you achieve a thick, smooth, and slushy consistency. Again, use your spatula to help incorporate all the ingredients, ensuring a uniform texture free from any large frozen pieces. You want this strawberry mixture to be just as lusciously thick and icy as the pineapple layer. The contrast in color and flavor between the two will be essential for the visual appeal and taste sensation of the final Pineapple Strawberry Swirled Slushies. Once blended, you should have two distinct, thick slushy bases ready for assembly.
Assembling the Swirl
Step 5: Layer and Swirl for the Perfect Finish
This is where the magic happens and our Pineapple Strawberry Swirled Slushies come to lifgin extractGrab your serving glasses. Begin by spooning a layer of the pineapple slushy into the bottom of each glass. Don’t fill it all the way to the top just yet. Next, carefully spoon a layer of the strawberry slushy on top of the pineapple. The key to a beautiful swirl is to alternate and then gently swirl the layers together. You can use a chopstick, a skewer, or even the handle of agin extractoon to create artistic patterns, dragging it down through the layers in a swirling motion. Be careful not to overmix, as you want distinct swirls of color and flavor rather than a uniform pinkish hue. Continue layering and swirling until your glasses are full. You can experiment with the ratio of pineapple to strawberry to find your perfect balance. For an extra touch, you could even add a few fresh strawberry slices or a small pineapple wedge to the rim of the glass as a garnish before serving. Enjoy the refreshing taste of your beautifully swirled creation!

Conclusion:
And there you have it – a delightful journey into creating the perfect Pineapple Strawberry Swirled Slushies! We’ve explored how a few simple ingredients and a blender can transform into a vibrant, refreshing, and utterly delicious frozen treat. This recipe is not just about quenching your thirst; it’s about creating a moment of pure joy, perfect for a warm afternoon, a playful gathering, or just because. Remember, the beauty of the Pineapple Strawberry Swirled Slushies lies in its simplicity and adaptability. Don’t be afraid to experiment and make it your own!
For serving suggestions, these slushies are fantastic on their own, but consider garnishing with fresh pineapple chunks, whole strawberries, or even a sprig of mint for an extra touch of elegance. They’re also a wonderful accompaniment to light snacks like fruit platters or even a simple grilled cheese sandwich for a fun, unexpected pairing. Get creative with your swirled presentation – the more colorful, the better!
Frequently Asked Questions:
Can I make the Pineapple Strawberry Swirled Slushies without a blender?
While a blender is ideal for achieving the perfect slushy consistency, you could attempt this by finely chopping the frozen fruit and then mashing it vigorously with a fork or potato masher until it resembles a slushy texture. It will be more labor-intensive and might not be as smooth.
What are some other fruit variations for Pineapple Strawberry Swirled Slushies?
Absolutely! Feel free to swap out or add other frozen fruits. Mango, raspberry, peach, or even a hint of banana can be delightful additions or substitutions. Consider adding a splash of lime juice for an extra zesty kick, or a few fresh mint leaves for a cooling aroma.
How long can I store leftover Pineapple Strawberry Swirled Slushies?
For the best texture, it’s recommended to consume your Pineapple Strawberry Swirled Slushies immediately after preparation. If you do have leftovers, you can store them in an airtight container in the freezer for up to a week. However, they may freeze solid and require a bit of thawing or re-blending before enjoying.
Pineapple Strawberry Slushies
A refreshing and fruity swirled slushy made with pineapple and strawberries.
Ingredients
-
2 cups frozen pineapple chunks
-
1 cup pineapple juice or water
-
1 tablespoon honey (optional)
-
2 cups frozen strawberries
-
1 cup strawberry juice or water
-
1 tablespoon honey (optional)
Instructions
-
Step 1
Prepare the pineapple base by placing 2 cups of frozen pineapple chunks into a blender. Add 1 cup of pineapple juice or water and 1 tablespoon of honey (optional). -
Step 2
Blend the pineapple mixture until smooth and thick, scraping down the sides as needed. Set aside without washing the blender. -
Step 3
Craft the strawberry swirl by adding 2 cups of frozen strawberries to the same blender. Pour in 1 cup of strawberry juice or water and the remaining 1 tablespoon of honey (optional). -
Step 4
Blend the strawberry mixture until smooth and slushy, similar in consistency to the pineapple layer. -
Step 5
Assemble the slushies by spooning alternating layers of pineapple and strawberry mixtures into serving glasses. Gently swirl the layers with a chopstick or skewer for a marbled effect. Do not overmix. -
Step 6
Continue layering and swirling until glasses are full. Garnish with fresh fruit if desired and serve immediately.
Important Information
Nutrition Facts (Per Serving)
It is important to consider this information as approximate and not to use it as definitive health advice.
Allergy Information
Please check ingredients for potential allergens and consult a health professional if in doubt.